 Til indholdet


Brolægningsprojektet | Prikken over i'et
STARTSKUDDET
Huset er færdigt, græsplænen er lagt og trædækket omkring poolen er på plads. Det meste føles i top, men der mangler noget – brolægningen! Projektet starter for mig i en situation, hvor den grove planlægning er lavet, dvs. Graveentreprenører har lagt 0-30 tilslag rundt om hele huset og pakket materialet til nogenlunde det rigtige niveau. Hele området omkring huset inkl. garageindkørsel dækker 230 kvm. Et anstændigt udfordrende projekt for en enlig murer af lægmandskarakter.


PLANLÆGNING
Næste skridt var at lave en simpel skitse af projektet for at afmærke eksisterende niveauer samt bestemme stenens lægningsretning og tænke over, hvor kantstenen skulle placeres. Ikke en smuk skitse, men den tjener sit formål. Jeg har investeret i en rotationslaser fra Leica. Et instrument, der er et must for at være nogenlunde sikker på, at niveauerne ender lige fra start. Brugte det højeste punkt ved garageporten som referencepunkt og markerede relative højdeforskelle på skitsen. Guidet af det, toppede jeg med 0-16 de steder, det skulle til for at nå de ønskede højder og pakket med vibratorplade.


STENKAJERNET
Jeg gik og kiggede på udstillinger hos forskellige leverandører, men blev ret hurtigt hooked på en forholdsvis ny type sten - hamret sten. Den hamrede sten er lidt glattere og mindre takket end den tumlede stentype. Valget faldt på Benders Ocala Antik, grå. Stenfirmaet sammen med Benders havde også en kampagne på stenen, hver femte sten var gratis eller 20% :-) Det afgjorde sagen. Stenen kommer i tre forskellige størrelser 210x140x50, 175x140x50 og 140x140x50 blandet på samme palle. Tanken er, at stenen skal lægges tilfældigt og dermed bliver mønsteret tilfældigt og uregelmæssigt. Føltes som en forholdsvis nem type flise at lægge. Den er også kørebar, hvilket var et krav, fordi den valgte sten også kunne bruges på garageindkørslen.
For at undgå sprøjt på facaden, blev jeg frarådet at lægge fliserne helt op til fundamentet. Efterlad en afstand på 10-20 cm, hvor du lægger en form for grus. Jeg besluttede at forlade 15 cm og udfylde hullet med hav single, sort/hvid.
Den eneste kantsten jeg kunne komme i tanke om, indtil videre alligevel, er den ved garagens indkørsel. Trænger til en afgrænsning mod den ene side, hvor der er en gårdsingle. Vil ikke have det til at spilde ud på indkørslen. Her faldt valget på Benders Labyrinth maxi grafik 350x210x140. Jeg bestilte en masse ekstra af denne sten, da jeg har en ide om eventuelt at bygge nogle indrammede blomsterbede, men det skal vise sig, om det bliver til noget.


RIGTIGE TING
Jeg har lagt sten en gang før, og hvis der var én ting, jeg lærte, så var det - hav de rigtige ting! Og det er ikke forkert at have gode assistenter.

HØJRE VÆRKTØJ
Jokes og side. Jeg vil virkelig, ud over det indlysende ved en god spade og trillebør, anbefale at få følgende værktøjer til at gøre livet lidt lettere:
Det fungerer ok at bruge en rive til at sprede og jævne den knuste sten og sand, men en asfaltrive gør arbejdet meget lettere for dig. Et lige stykke planke kan bruges som en rettekant, men en metalrettede til formålet er at foretrække. Det er effektivt at bruge til fradragene, men kommer også godt med, når du vil tjekke, at stenrækkerne er lige. Stensætningshammer, som jeg fandt hos Stenbolaget, bruger jeg primært til at tegne furer i sættesandet, til at lægge udløbsrørene i.
- Asfalt lige
- Rektangel
- Et rigtig godt vaterpas
- Stensætterhammer
- Udtræksrør, stålrør med en diameter på 2,5-3 cm
Det fungerer ok at bruge en rive til at sprede og jævne den knuste sten og sand, men en asfaltrive gør arbejdet meget lettere for dig. Et lige stykke planke kan bruges som en rettekant, men en metalrettede til formålet er at foretrække. Det er effektivt at bruge til fradragene, men kommer også godt med, når du vil tjekke, at stenrækkerne er lige. Stensætningshammer, som jeg fandt hos Stenbolaget, bruger jeg primært til at tegne furer i sættesandet, til at lægge udløbsrørene i.

ARBEJDSKURSET
Med det bærende lag på plads i de rigtige højder, fortsætter jeg med at køre det bundfældende sand, stenmel 0-4 ud. Jeg bruger asfaltriven til at lave et ca 3 cm tykt lag sand. Dernæst ramte jeg overfladen med en 90 kg vibratorplade. En god idé er at vande overfladen inden den slås for at gøre den rigtig kompakt og for at undgå støv. Næste trin bliver at lægge trækskinnerne (rørene) ud på nogenlunde de rigtige steder, få stensætterens hammer ud, og drive furer, ned til lejefladen uden at rive den op, med støtte fra rørene for at furer lige. Læg rørene ned og vej dem med et vaterpas. Et tip er at være omhyggelig med at sikre, at udsugningsrørene får god støtte nedenunder, det vil sige at pakke sand rundt om rørene, så de ligger stille under udsugningsarbejdet.


LÆGNINGSARBEJDET
For at få en rimelig afstand til væggen, valgte jeg at bruge et 145mm bræt, som jeg placerede langs fundamentet, hvilket også hjælper mig med at holde en lige linje, når jeg skal lægge stenene. Jeg starter belægningen tættest på fundamentet og arbejder mig udad. Det kan være en smule vanskeligt at få adgang til hjørnerne uden at ødelægge den afisolerede overflade. Fandt nogle gamle lamelskodder, der blev brugt som landgangsbroer. Fungerede perfekt. Når du arbejder dig ud fra muren, er det vigtigt at kontrollere, at stenrækkerne forbliver lige. Det er her den lige skive kommer til nytte. Læg den langs stenrækken for kontrol og slå om nødvendigt mod stenrækken eller juster sten for sten. Det er også vigtigt at fylde furerne med sættesand og pakke let med hånden. Opdagede ret hurtigt, at jeg ikke havde været omhyggelig nok med at fylde furerne, da stenene sank et stykke ned langs afløbsledningerne. Med lidt eftertanke er det nok bedre at have fradragsvejene vinkelret på læggeretningen. En mindre del af stenoverfladen ender så over drænfuren, og det skulle mindske risikoen for, at stenen sætter sig. Det er dog bedre at sørge for, at furerne er ordentligt opfyldt, og at sandet i dem er pakket.
Under lægningen kan du vælge enten at trække første række helt ud eller begynde at bygge på "bredden", så du får en trekantform. Jeg valgte det sidste. Det fungerede godt, men bemærkede hurtigt, at det var svært at holde lige linjer hen over det hele. Skiftede til den anden taktik og forvent at køre den fremadrettet.
Under lægningen kan du vælge enten at trække første række helt ud eller begynde at bygge på "bredden", så du får en trekantform. Jeg valgte det sidste. Det fungerede godt, men bemærkede hurtigt, at det var svært at holde lige linjer hen over det hele. Skiftede til den anden taktik og forvent at køre den fremadrettet.

FREMSKRIFT
Arbejdet skrider frem i et rimeligt tempo. Det ser ud til at være muligt at holde et tempo på omkring 20 kvadratmeter om dagen. Det, der bremser arbejdet mest og kræver mange kræfter, er arbejdet med at få stenen til lægningsstedet. Med græsplæne rundt omkring vil jeg ikke bære stenen ind med en maskine, men skal bruge en trillebør. Hvis det er muligt at få pallerne fordelt ud over læggefladen, synes jeg, det sparer meget tid og energi.
Vælg forstenen til at bryde overfladen ved at bygge i to stenkasser nær husmuren til brug som blomsterbede. Sørg for, at de ender et stykke væk fra husmuren. Træhuse har ikke godt af at have vegetation i nærheden.
Vælg forstenen til at bryde overfladen ved at bygge i to stenkasser nær husmuren til brug som blomsterbede. Sørg for, at de ender et stykke væk fra husmuren. Træhuse har ikke godt af at have vegetation i nærheden.

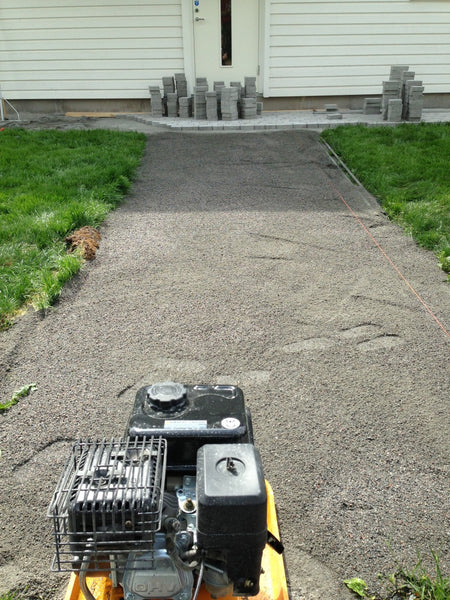
VIBRATORPLADE
Som far til tre er det ikke helt let at kunne arbejde sammenhængende i fred og ro, må jeg sige. Det betyder, at man arbejder lidt her og lidt der. Det er ret stressende at gå og leje en vibratorplade til enhver tid. Frem og tilbage. Fik et tip af en nabo om at kigge ind i Bauhaus, som har lidt enklere og lettere vibratorplader. Det viste sig at være en Hercules RP1300B, der vejer 90 kg. Fuldstændig nok til at slå sættesand med. Den kommer også med en polyurethanmåtte, der kan bruges til at køre på fliserne, inden fugesandet påføres. Den kostede 4295 kr. At leje en sådan koster omkring 250 SEK/dag og med min spredte arbejdsindsats vil lejeprisen hurtigt forsvinde og nærme sig købsprisen. Meget rart at have en af dine egne :-) og ikke skulle tænke på tilgængelighed.

FORBRUGSVARE
Arbejdshandsker er et must. Huden på hænderne bliver ellers hurtigt malet ned og bliver tør. Handskerne slides hurtigt.

INDGANGEN
Jeg besluttede at gøre passagen 140 cm bred, 10 cm på hver side af dørbeklædningen til indgangen. Jeg trak en streg vinkelret ud fra væggen. Foretog også en kontrolmåling vedrørende faldet fra hjemmet til vejen. Det viste sig at være 10 cm og faldet var 5 cm/cm. Det begyndte at regne, men stædig som du er, ville jeg rydde vejen. Våd som en kat! Hvis du efterlader den sarte overflade uden sten, har du hurtigt masser af små fodspor i sandet.


FORSIDEN TAGER FORM
Indtrykket af huset bliver et helt andet, nu hvor stenen begynder at komme på plads. Det giver smag til dette ellers ret trættende arbejde.

VIGTIG STIK OG GUMMIKLUB
Skrev tidligere om vigtigheden af det rigtige værktøj, men savnede to andre vigtige hjælpemidler gummihammer og en lige pind. Gummihammeren er et must for at tilpasse sig de sten, der ender ujævnt. Pinden kommer godt med, når udtræksstierne skal forlænges. Det er vigtigt, at forlængelsen ender i samme starthøjde. Det kan være lidt svært at se, om røret virkelig er i niveau med den færdige overflade. Sørg for, at røret starter en lille smule ind i den færdige overflade. Placer pinden i den ende og vej, så pinden ligger fladt på overfladen og rører røret. Så bliver højden korrekt.

ANDEN RETNING
Belægningen skal løbe langs hele husets langside, en afstand på ca. 20 meter. Det er en udfordring at holde lige linjer over så store afstande. Øjet opfatter ganske små afvigelser i længderetningen. For at mindske risikoen for dette og samtidig få lidt mere liv til overfladen, valgte jeg at bryde mønsteret og lægge stenen hen over karnappen.


BRØNDE
Jeg gemmer al tilpasning og beskæring til sidst. Da jeg ikke har min egen stenskærer, men overvejede at leje en, er det lige så godt at lave alt sådan arbejde på samme tid.

BAGSIDEN KLAR
En panoramaudsigt over bagsiden af huset. Puha, det var svært at lægge denne sydside. Det bliver rigtig varmt, når solen skinner. Jeg synes, det var helt rigtigt at bryde mønsteret og ændre retningen på midterdelen. Linjen langs hele strækningen er ikke helt lige, men næsten. Det forstyrrer i hvert fald ikke øjet. Det, der dog forstyrrer, er al den regn, der er faldet. Kanterne tager et tæsk. Den kant af garagen, hvor vandet fra garagetaget kommer ned, er mere eller mindre skyllet væk. Indså, at kanten ikke vil holde, som den er nu. Efter lidt overvejelse og diskussion med Mats på Stenbolaget besluttede jeg at bestille stålkanter. Stålkanterne er 1 meter lange og kilet ind i sandet langs rækkerne. Det vil ikke være synligt, når sand og jord er blevet fyldt mod kanten af stenen.

GARAGEINDKØRSEL
Nu er jeg nået rundt i huset, og nu er finalen tilbage - garageindkørslen! Her er det vigtigt at være præcis. Det, der bekymrer mig mest, er, at der kommer hjulspor i indkørslen efter et stykke tid. Det er ikke kønt, og du er afsløret som lægmand. Det er også vigtigt at lave sagen, så vandet kan løbe væk.
Jeg startede med at sætte kantstenene, Benders Labyrinth, Graphite. Det bliver en flot ramme og en forudsætning for at kunne tudse op på fliserne mod slutningen. Uden kant er der stor risiko for, at pladerne bliver skubbet ud til siderne. Brøndene ved siden af indkørslen tilføjer det lidt. De er så tæt på hinanden, at de ikke kan vendes lige, men skal vippes. Efter lidt frem og tilbage lagde jeg linen så tæt på brøndene som muligt. Skær endda et stykke ud af en af stenene for at tjene 1 dm.
Et spørgsmål, jeg havde, var, hvordan disse brønde og rør rent faktisk fungerer. De sad for langt ned til at begynde med. Først turde jeg ikke trække i rørene. Hvis de falder i jorden, er det en katastrofe. Så skal du grave op. Det viser sig, at disse kikkerter er af teleskoptypen, det er disse også. Træk blot i rørene, eller brug rettere et spyd eller koben til at få dem løs. Vær bare opmærksom på, hvor langt teleskopet er. Der er risiko for, at røret springer ud.


STOP I MASKINEN
Efter at have nået hjørnet ved garagen, stoppede jeg i indkørslen. Dette er for at lave en ny række på linje med fronten af garagen. Ønskes den "første" række tæt på garagegulvet. Rækken før gik ikke jævnt op, selvfølgelig(!) bliver det en smal justeringsrække. Så langt så godt. Hvad værre var, er, at jeg ikke var forsigtig nok med at sikre linjen hele vejen over indkørslen. Brugte ligekanten mod garagefundamentet til at sætte linjen og første række. Det viste sig, lidt for sent, at det står lige udenfor garageporten, men at linjerne så drejer lidt til venstre mod huset. For at ordne det hele tænkte jeg på at tilføje 2-3 justeringslinjer som billedet viser. Jeg ved ikke, om det er mig, der er kræsen, men det føltes ikke rigtigt.
Valgte til sidst at flytte for enden mod huset. Billede to viser begyndelsen på det noget besværlige rettelsesarbejde. Det tager lidt tid at lave om, må jeg indrømme. Denne gang brugte jeg en line hele vejen for at sikre, at den bliver god hele vejen. Det skyldtes ikke blot, at jorden skråner ned fra garageudgangen. Gentog formentlig den første linje ti gange, før jeg var tilfreds. Det er så vigtigt at starte rigtigt! Så flyder resten så meget hurtigere og nemmere. Hvis du skal blive ved med at kompensere for en dårlig udgangsposition, bliver jobbet frustrerende og ikke så sjovt at udføre. Det påvirker naturligvis også det endelige resultat. Ja, det er rigtigt, en anden forstyrrende faktor var, at kanten af garagefundamentet ikke var helt plan. Der var små stykker beton, der var væltet over under støbningen, hvilket gjorde, at nogle sten endte lidt skævt. Dette afspejles i det fortsatte lægningsarbejde. Mit tip er at banke så meget væk som muligt og glatte kanten, hvis du påfører digtet på et fundament. Det virker ikke 100%, bemærkede jeg. Måden at håndtere dette på er at tilspidse stenene, ved udragende dele, med en geringssav eller stensav for at få den yderste side af rækken lige - helst søm lige!
Valgte til sidst at flytte for enden mod huset. Billede to viser begyndelsen på det noget besværlige rettelsesarbejde. Det tager lidt tid at lave om, må jeg indrømme. Denne gang brugte jeg en line hele vejen for at sikre, at den bliver god hele vejen. Det skyldtes ikke blot, at jorden skråner ned fra garageudgangen. Gentog formentlig den første linje ti gange, før jeg var tilfreds. Det er så vigtigt at starte rigtigt! Så flyder resten så meget hurtigere og nemmere. Hvis du skal blive ved med at kompensere for en dårlig udgangsposition, bliver jobbet frustrerende og ikke så sjovt at udføre. Det påvirker naturligvis også det endelige resultat. Ja, det er rigtigt, en anden forstyrrende faktor var, at kanten af garagefundamentet ikke var helt plan. Der var små stykker beton, der var væltet over under støbningen, hvilket gjorde, at nogle sten endte lidt skævt. Dette afspejles i det fortsatte lægningsarbejde. Mit tip er at banke så meget væk som muligt og glatte kanten, hvis du påfører digtet på et fundament. Det virker ikke 100%, bemærkede jeg. Måden at håndtere dette på er at tilspidse stenene, ved udragende dele, med en geringssav eller stensav for at få den yderste side af rækken lige - helst søm lige!


STENNE PÅ PLADS
Efter en uges pause i projektet var det nu tid til at tage det sidste skridt. Læggearbejdet viste sig at gå forholdsvis hurtigt. Det var umagen værd at omarrangere for at få linjerne så lige som muligt. De næste par linjer blev næsten automatisk lige. Med løbende små justeringer var der ingen problemer med at holde stregen, og jeg var meget tilfreds med resultatet. Selv sagen ser ved første øjekast ud til at være blevet, som jeg havde forestillet mig. Tanken er, at vandet skal ledes til det ene hjørne ved vejen. Det er tilbage at lave en vandafledning derfra. Tænker på at tage et hul op i bunden af kantstenen, så vandet kan finde vej ud den vej og ud på græsplænen.
En af naboerne slentrede forbi og jublede lidt. Han sagde, at hvis han ikke vidste bedre, ville han have troet, at jobbet var udført af en "rigtig" stensætter. Godt at høre!
En af naboerne slentrede forbi og jublede lidt. Han sagde, at hvis han ikke vidste bedre, ville han have troet, at jobbet var udført af en "rigtig" stensætter. Godt at høre!


SKÆRING
Nu begynder det møjsommelige arbejde med at skære og rydde op i alle kanter. Begynder med indgangen til huset. Jeg har en geringssav med en coromant-skive for at teste og se, hvordan den virker. Planen er at leje en stensav hos Hyreshuset eller Ramirent, men hvem kan vente. Det bliver en stensav resten af jobbet, kan jeg afsløre. Hvis du vil have lige kanter og vinkler, er sådan en uovertruffen.
Hvis du derimod vil begynde at lave buede snit, vil geringssaven være praktisk. Bare tag omridset rundt om stenen. Slå den derefter løs med en stålkile. Det kan gå galt med en enkelt sten, da de ikke altid går i stykker som forventet ;-)
Hvis du derimod vil begynde at lave buede snit, vil geringssaven være praktisk. Bare tag omridset rundt om stenen. Slå den derefter løs med en stålkile. Det kan gå galt med en enkelt sten, da de ikke altid går i stykker som forventet ;-)

STENSAV
Det fungerer helt fint at save sten med vinkelsnit som med rundingen på billedet, men hvis du vil lave lige snit, gælder det som sagt en stensav. Det er så meget mere effektivt, og snittene er lige og pæne. Jeg lejede maskinen i Hyreshuset. Det tog mig 12 timers hårdt arbejde at få alle de "lige" afleveringsstykker. Tilpasning omkring brønde og regnvandsledninger tilbage. Huslejen landede på 640 SEK. Hver en øre værd!


OMKRING DAGVANDSRØR
Tænkte jeg kunne vise lidt mere detaljeret hvordan jeg får en konkav udskæring til som i dette tilfælde til montering omkring et regnvandsrør. Start med at tegne omridset på stenen – rundt om hele stenen! Skær i tynde skiver hele vejen rundt for at få en fornemmelse af, hvordan stykket bliver. Klip dybere i kanterne og på bagsiden. Du vil bemærke, at det ikke virker at skære dybt på oversiden uden at ødelægge omridset. Lav flere snit for at "svække" stenen, der skal fjernes.
Begynd så med at slå et lille stykke af fra hver kant. I kanterne savede saven næsten hele vejen igennem, og der skal ikke meget til, før stykkerne kommer af. Hovedårsagen til at starte på denne måde, har jeg fundet ud af, er at blotlægge de følsomme kanter/hjørner. I starten forsøgte jeg at slå hele stykket af på én gang. Det endte hver gang med, at kanterne revnede. Utrolig frustrerende.
Med den ru form på plads, er det bare et spørgsmål om at pudse overfladen med vinkelsliberen og sætte stykket på plads.


VIBRATION OP PÅ PLADERNE
Med alle stenene på plads, er det nu tid til virkelig at "sætte" stenene med vibratoren, inden fugesandet kommer på. Jeg monterer gummimåtten på vibratorpladen. Sørg for at feje overfladen fri for småsten og andet, der ellers risikerer at ridse stenoverfladen. Så er det bare at køre! Jeg startede med kanterne, som jeg forstod var færdige. Udover det kan du vælge at gå langs eller på tværs af fliserne. Jeg prøvede begge varianter og kan ikke sige, at jeg kunne se nogen forskel i resultater.
På det andet billede (i dette afsnit) kan du se en stålkant i bunden. I netop denne del af belægningen er plænekanten lavere end fliserne, hvilket gør de yderste rækker af fliser sårbare. Det var tydeligt at mærke, da det regnede kraftigt for en uges tid siden. Bundfældningssandet under pladerne, ved dette afsnit, blev mere eller mindre skyllet væk, og pladerne bundfældede. Bare for at lave om og gøre det rigtigt. Med stålkanten, som jeg slog ned med en gummihammer, bliver stenkanten meget stabil.
På det andet billede (i dette afsnit) kan du se en stålkant i bunden. I netop denne del af belægningen er plænekanten lavere end fliserne, hvilket gør de yderste rækker af fliser sårbare. Det var tydeligt at mærke, da det regnede kraftigt for en uges tid siden. Bundfældningssandet under pladerne, ved dette afsnit, blev mere eller mindre skyllet væk, og pladerne bundfældede. Bare for at lave om og gøre det rigtigt. Med stålkanten, som jeg slog ned med en gummihammer, bliver stenkanten meget stabil.


FINJUSTERING
Før fugesandet lægges på, kan der være en eller to sten, der skal justeres. I mit tilfælde er det en flok.Når fugesandet først er på plads, bliver det væsentligt sværere at få stenene løs.
For at rejse de sten, der skal justeres, er der brug for nogle værktøjer. Jeg fandt en gammel teltstang. Skulle have haft brug for to. Med to, en i hvert diagonalt hjørne, er det ret nemt at få stenene op. Fyld med hærdningssand, sæt tilbage og bank med gummihammeren.
For at rejse de sten, der skal justeres, er der brug for nogle værktøjer. Jeg fandt en gammel teltstang. Skulle have haft brug for to. Med to, en i hvert diagonalt hjørne, er det ret nemt at få stenene op. Fyld med hærdningssand, sæt tilbage og bank med gummihammeren.

FIND
Nu er det tid til at lægge fugesandet på. Jeg bruger det hærdningssand der blev tilovers, altså stenmel 0-4. Det viser sig dog at være mere besværligt arbejde, end jeg havde forventet, at få sandet ned mellem stenene. Stenmelet er for groft. Det der sker er at de større korn bliver oven på stenene og jeg må feje indtil jeg er grøn i ansigtet for at få stenmelet ned. Efter lidt konsultation med Stenbolaget er konklusionen, at jeg kan gå på sandtaget og købe en trillebør med stenmel 0-2.

PROJEKT UDFØRT!
Med stenmel i str. 0-2 gik fugningen meget glattere, selvom det er ret besværligt arbejde at feje sandet mellem stenene. Fugesandet skal fejes ned i partier. Det føles næsten som en evighed af arbejde. Du skal nok gøre det bedste du kan og udfylde hvor efter. Helt sikkert også næste sæson.
Det var et sjovt, men hårdt projekt. Alt i alt har jeg udlagt cirka 8800 sten, hvilket svarer til cirka 23 tons flyttede sten. Tænk, hvad man kan opnå med lidt vedholdenhed :-) Efter at have lagt alle udgifter sammen inklusive indkøb af vibratorplade og værktøj samt lejeudgifter, landede projektet på 70.500 kr.
Det var virkelig sjovt at blive kåret som månedens projekt i juni. Det har inspireret mig yderligere. Næste projekt bliver i landet, hvor der skal lægges belægningssten og formentlig bygges mure, men det må blive næste år!


