Til indholdet


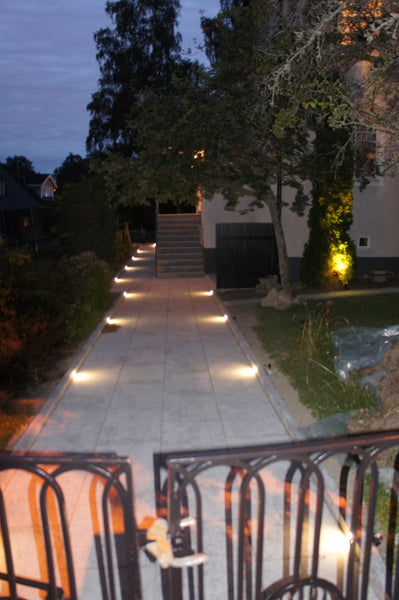
Sten gangbro med stil
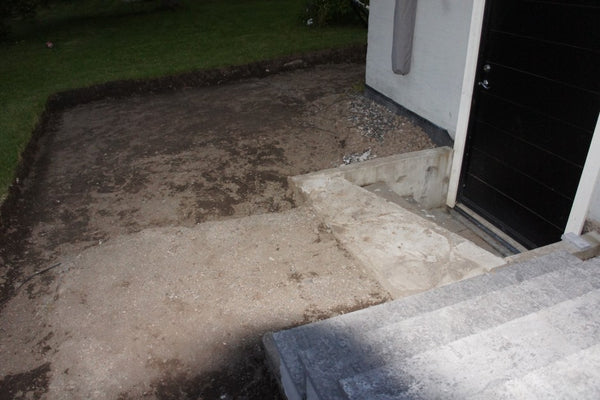
Vores "græsklædte" gamle stengange
Den gamle stengang bestod af stenbeklædte betonplader, men var stort set bevokset med græs. Betontrappen havde forvitret og trængte til et akut behov for reparation.


Reparationstrin
Al løs og dårlig betonbelægning på de gamle trin blev slået væk. Derefter blev der lavet forme og støbt nye trin på plads.


Udvalg af sten
Da vi kom til Stenbolaget i Arninge, havde vi svært ved at vælge mellem de forskellige stenalternativer. Vi var dog fast besluttet på, at det ville være natursten. Vi "hoppede fra sten til sten", men heldigvis var der en flink og vidende fyr, som tog fat i situationen og guidede os med sikker hånd til en god beslutning - Kalk Mørk Kalk 700x500 mm og kantsten i samme materiale. Til trinene var det perfekt med den mindre størrelse 600x300.

Trappen "som ny"!!
Vi valgte at lægge sten på både trappetrin og fronter. Forsøgte et par forskellige mønstre til at lægge stenene, men satte sig fast, da hvert andet trin blev ens. Tror det er godt at undgå at få fugerne direkte ind under hinanden. Vi lader stenen gå omkring en centimeter uden for trappen for at få en flot profil.Vi var i hvert fald meget tilfredse med resultatet - den fulde trappe hører fortiden til!!


Tid til at tage fat i gangen
Først blev alle de gamle grimme fliser fjernet, ganske vist sammen med en masse ukrudt. Vi ville også benytte lejligheden til at udvide passagen for at gøre det nemmere at passere under trappen. Vi håber på at forvandle pladsen under trappen til cykelparkering. Da det havde eksisteret en gang før, var der et fundament at tage udgangspunkt i. Det gamle sand blev jævnet med jorden, og den vibrerende plade blev kørt frem og tilbage, frem og tilbage.


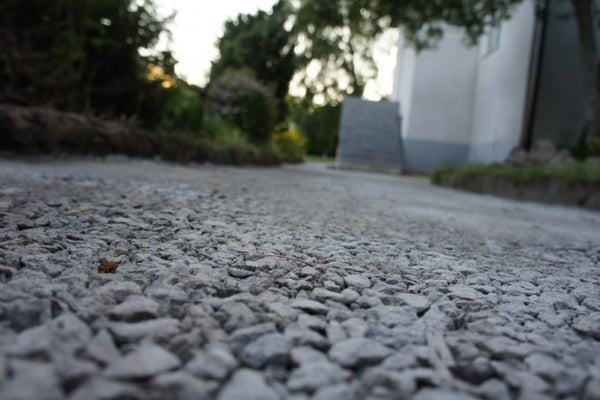
Hvor meget grus skal der til!?!
Efter at jorddugen var lagt ud, var det tid til stenknuser. Vi har brugt i alt 16 tons stenknuser 0-16 mm og 7 tons stenmel 0-4 mm!! Vibrationspladen er løbet varm - frem og tilbage, frem og tilbage. Al den regn, der er kommet med jævne mellemrum denne sommer, må tilsyneladende have været godt for delarbejdet indtil denne gang - altid noget positivt!

Kantsten med belysning
Nu var det tid til at lægge kantstenen ud, som er samme materiale som fliserne, altså kalksten Dark Lime. Lidt mere end halvdelen af stenen ender under gangfladen. Der var gravet ud med god margin ud mod midtergangens ydersider, så det var nemt at cementere kantstenene ordentligt. Der vil også være lidt belysning. Hos Stenbolaget fandt vi små LED-lamper med "varmt" lys fra in-lite. Da vi fandt en fyr, der hurtigt kunne bore huller i 15 sten, var vi meget tilfredse – indtil vi opdagede, at han borede over halvdelen af dem på den forkerte side.! Heldigvis kunne fejlen være gemt under et par lag knust sten og stenmel.


Den "røde tråd"
Hældningen af gangen kontrolleres til enhver tid med den røde tråd. Under hanen er der en regnvandsbrønd, og vores håb er, at alt regnvandet kommer dertil.


Sokkel mod fundamentet
Vi fandt en tyndere flise, der var et lignende materiale som flisestenen, en lidt mørkere nuance, men som vil passe godt sammen med det ommalede fundament. Det var en flot afslutning mod væggen!

Den sidste fase!!
Nu fik vi vejret på vores side, med en pause i regnen i et par dage. Så kunne vi lægge fleksleddet og vande i vores eget tempo. Fundamentet er malet, belysningen på plads, nyt indgangstag og jernhegnet bygget på stedet af vores dygtige håndværkere.


Udført!
Jeg havde det lidt dårligt med belysningen i disse øko-sparetider, men blev bestemt beroliget, da jeg beregnede det årlige forbrug!!Med disse moderne LED-lamper fra in-lite bruger du meget lidt energi!! De små er på 0,5 W og de større pletter ved tujaerne er på 4,5 W.Til gengæld får du en smukt oplyst havesti og måske bedre beskyttelse mod ubudne gæster.Håber vi har inspireret nogen, det ville gøre os meget glade. Held og lykke med dine projekter!!